Google Analytics

Thursday, September 29, 2011

Chicken lettuce cups


After reading the reviews on the recipe for these chicken lettuce cups - I knew I was going to need to get a little creative to kick the flavor up a notch.  Therefore I: added a couple teaspoons of red pepper flakes to the ground chicken, used milder/saltier green olives (I can't remember the variety, but I grabbed them from the antipasti bar), and substituted ricotta salata cheese for the mozzarella.

The end result was incredibly tasty.  Just ask Ed.  He inhaled six of these babies.


Monday, September 26, 2011

Step into the Zone


About a week ago, my sister and I decided to go on the Zone diet together.  She wants to lose the last of her baby weight, and I want to shed the 6lbs I gained thanks to my trip to Montana (What?!  Light beer doesn't have zero calories?!  I consumed about 400 - 500 extra calories a day, thanks to light beer and junk food, for almost 10 days).  We've successfully followed the Zone plan before, and kept the weight off for years, so it was easy to decide what diet plan to turn to.
The Zone diet is all about portion control and a balance of carbs to protein to fat - so basically any dish can be a "Zone" meal.  Case in point, the Fajita Turkey Burger pictured above (note: I took a pic of Ed's "non-Zone" burger).  1 burger + 1/2 pita + 1.5 Tbl guacamole + tomatoes/onions/lettuce = a 3 block Zone meal.  Yumm!  We're both eating 11 - 13 Zone blocks/day.
Christie and I have been texting each other pictures and/or descriptions of each of our meals and snacks.  Obsessive, I know, but it keeps us honest.

I have this bad habit of drinking my carbs at night instead of eating them (4 oz of wine or 1 oz of vodka = 1 Zone carb block).  I tell myself, "Come on Calina, you can have a cup of strawberries instead of that glass of wine!  Or 6 cups of lettuce!"

The wine always wins.  Nuts.


Saturday, September 24, 2011

Warm Seattle Fall Day

Murgh - I bought the J.Crew blouse, pictured in the set below (click for details) two + weeks ago (i.e. not on sale).  Sigh.

Oh well, I love the blouse - it's the perfect length for pairing with my corduroy jeggings!

What I threw on today (a warm Seattle fall day):


Warm Seattle Fall Day

Thursday, September 22, 2011

Hive & Honey at Piperlime


The lust-worthy clothing at piperlime.com usually runs on the $$$ side - however, I recently stumbled upon a chic and reasonably priced line they carry: Hive & Honey.

I pulled the trigger on the suede trim blazer (pictured above) and was pretty pleased with the quality and fit (purchased my normal size, M).

A few other nice options in the Hive & Honey line:


Tuesday, September 20, 2011

Simple Salmon Chirashi


It's nice being married to a foodie.

Case in point: the other night, while I spent quality time on the couch with my Kindle, my husband whipped up Salmon Chirashi (pictured above) for dinner.

The flavors in this dish were divine: briny seaweed and soy, creamy and mild avocado, nutty sesame, and a sinus clearing kick courtesy of wasabi.

Friday, September 16, 2011

Creamy stovetop corn with poblano chiles


This dish is, hands down, the best corn dish I've ever had (yes, it even beats out the scrumptious roasted corn w/chipotle lime butter at the Waterfront Seafood Grill).

Thank you New York Times - I will forever be grateful for Ed discovering this recipe for creamy stovetop corn in your pages.

Monday, September 12, 2011

A quick cabin tour (part 2)

The mini tour of our Montana cabin continued.  Please ignore the clutter - DIY'ing and crafting in progress.

Downstairs bathroom before

Getting better!
(thanks to all my hard labor painting)

Living room before

Getting better!
(we still need a wood burning stove)

Kitchen before

A billion times better

My lovely new hammock

And my lovely new boat


Check out my friend Leigh's Montana snaps here.

Friday, September 9, 2011

DIY upholstered headboard


During my 10 day crafting extravaganza at our Montana cabin, I managed to whip out a DIY upholstered headboard for a queen size bed in one of our guest bedrooms.  This project took me less than 45-minutes to complete.

Materials:
4x8 plywood cut down to 4x5 ($6.00 at Lowes, the cutting is free - just ask)
Twin sized foam mattress topper ($9.99 at Walmart)
1 1/2 - 2 yrds upholstery fabric (I used Waverly Small Talk Mint Julep, $14.98/yrd)
Staplegun
3M spray adhesive
Scissors
Hardware to attach the frame to the bed ($.10 for each nut/bolt) & drill

Instructions:

Spray the back of your mattress topper with adhesive, and attach it to the plywood (textured side down). You may want to let the foam hang 1 inch over the edges of the headboard, in order to soften them.

Cut an approx 10" strip from your fabric, and set aside.  Now, align your fabric on top of the foam, making sure your fabric is long enough to cover the area of the headboard that will be exposed (above your mattress) and that, if applicable, your fabric's pattern is facing the right direction.  If your fabric isn't wide enough to cover the headboard with the pattern facing the right-way (I ran into this problem), get creative.  Stitch strips of fabric along the outside edges to widen, or break your fabric up into thirds and stitch. 

Once your fabric is aligned, start stapling the top edge to the back of your headboard.  Once you have a few staples in, pull the fabric tight and place a few staples along the bottom edge of the fabric (into the front of the plywood).  Continue stapling until the fabric is secure.  Save the corners for last.

To finish off your headboard you'll need to attach the strip of fabric you set aside earlier to the exposed sides of the plywood (near the bottom).  Make sure your fabric is wide enough to cover the area that will be visible, cut to size, and staple.

Attach your headboard to your bed frame.


Thursday, September 8, 2011

A quick cabin tour (part one)

Now that our cabin finally has stuff (i.e. furniture, light fixtures, art, crafts, junk) in it - I thought I'd give you a little "before" and "now" tour of a couple rooms. (note: these are not "after" pics since we're far from done...)

Entryway area before

and now


Downstairs bedroom before

and now

 Deck before

and now
 (Maureen enjoying the sunshine - grill not shown)

Wednesday, September 7, 2011

Chalkboard headboard


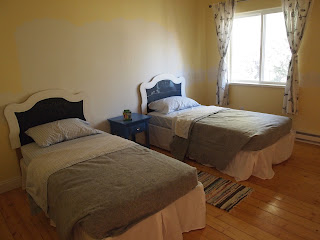
First, please ignore the wonky wall in the background.  I was hoping we could get the bedrooms in our cabin painted before our guests came over for Labor Day weekend, but our handyman barely had time to finish and prime the drywall (did I mention we had to re-plumb the whole place and had big gaping holes in the several walls?)

Anyhoo, I did manage to finish my chalkboard headboard project (inspiration here).  Instead of breaking out the saw and trying to shape a piece of plywood, I decided to buy a cheapo headboard (my fingers thank me). 

I taped off the area I wanted to cover with chalkboard paint, applied a coat of primer, then two coats of chalkboard paint.  After letting it dry for three days, I conditioned the chalkboard with the side of a piece of chalk, erased, and then set out a box of colored chalk for my friend Leigh's kids.


I definitely think I either need to (1) cut a couple inches off the headboards' legs or (2) paint the legs white....but that's a project for another time.

Tuesday, September 6, 2011

I'm back!!

I'm back from Montana and, yes, I managed to tackle almost all the items on my vacation crafting list.

A few of you may recall my den configuration dilemma (post here) - well I'm happy to report its well on its way to being solved thanks to the caned chairs I refinished and a chaise I picked up from CraigsList.

Note: curtains are from Ikea, I made the tie-backs with leftover fabric
from the chairs.  I also crafted the lumbar pillows.  The walls are Behr Gentle Rain.


The den still needs a few finishing touches, and Ed needs to mount speakers and hide wires and what-not, but at least we now have seating!

A "before" picture for good measure:


And a pic of the den when I did my first walk through of the cabin: